undocumented DOS commands

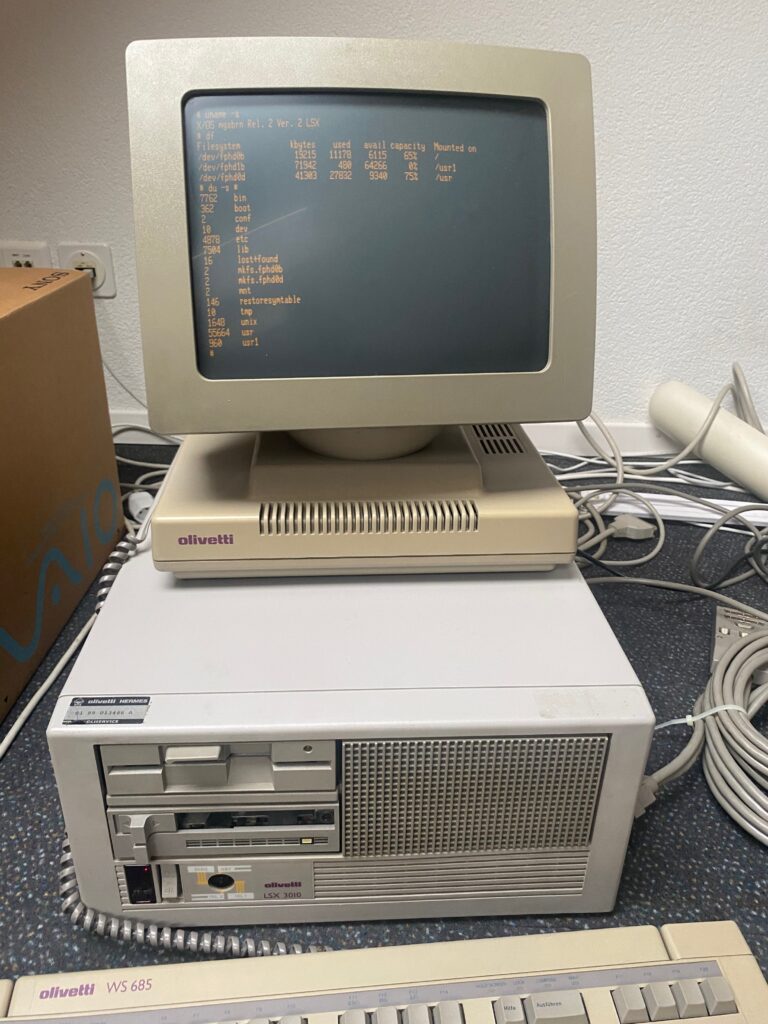
just an old but interesting file I’ve found on the-eye.eu

Shhh! The Undocumented DOS Commands
===================================

Version 1.06
Copyright (C) 1995, 1996, 1997, 1998, 1999 by Kevtronics
Portions are featured in the November 1996 issue of DOS World Magazine.
Last updated on Friday, January 1, 1999.

Available on the World Wide Web at:
http://ourworld.compuserve.com/homepages/kevtronics/undoc.txt

If you're looking at this from my Web site, you may be asking, "why is this
still in text-file format?" Well, I still like to upload this list to
CompuServe and Usenet so I choose to keep it in plain ASCII text format
instead of embellishing it with HTML features. So please excuse the bland
appearance while you enjoy the following details on the dozens of DOS
commands Microsoft and IBM don't want you to know about!

These commands may or may not work with your version or brand of DOS.
Most of them reqire DOS 4.0 or higher but some may work with earlier
versions.

Note: "MS-DOS 7.x" refers to both the MS-DOS 7.0 that comes with Windows 95
and the MS-DOS 7.1 that comes with Windows 95 OEM Service Release 2.
Windows 98 includes a slightly updated version of MS-DOS 7.1, which may be
called MS-DOS 8.0 (I don't have a Windows 98 package available to find out).
If and when I do obtain Windows 98 (surely not by donating $90 to Mustapha
Gates), I will list any additional undocumented DOS commands it contains.

Gossip: There are rumors that Microsoft has produced a special version of
MS-DOS for the U.S. goverment and military, called MS-DOS 6.23. U.S. armed
forces members have reported seeing original installation disks for MS-DOS
6.23 and claim that they use MS-DOS 6.23 on their computers. I'm not sure
what the differences between MS-DOS 6.22 and 6.23 are. If anyone knows,
please let me know.

Command                 Description
----------------------  --------------------------------------------------

;                       (CONFIG.SYS only) A short-cut for the REM
			command.

::                      (Batch files only) Another short-cut for the REM
			command, but faster (DOS just skips over any ::
			lines rather than processing them).

ANSI.SYS /L             (CONFIG.SYS only) /SCREENSIZE={number} or
         /S             /S={number} sets the maximum number of lines to
         /SCREENSIZE    reserve for a screen buffer. Default is /S=25 --
                        use /S=43 or /S=50 to support full use of EGA/VGA
                        43/50-line screens. Or use /S=1 to save memory
                        when the screen save/recall function is not used.
                        Anyone know what /L does?

ATTRIB,                 (ATTRIB followed by a comma) Same effect as
			ATTRIB -A -H -R -S *.* (removes attributes of all 
			files in the current directory).

AVAILDEV                (CONFIG.SYS only) Only in DOS 2.x; see end of file
                        for detailed information.

BACKUP /HD              When auto-formatting a disk for backup use, /HD
                        causes the disk to always be formatted to high
                        density (1.2 or 1.44 Mb).

CHKDSK /!               According to IBM, /! is a goof-up in the code of
                        CHKDSK. When used, it does not affect the
                        operation of CHKDSK in any way. Only in IBM's PC DOS
                        7.0 and possibly PC DOS 2000.

COMMAND /F              Automatically (F)ails floppy disk drive errors.
			Works either at the DOS prompt or in your
                        SHELL=COMMAND.COM... line in CONFIG.SYS. Requires
                        DOS 3.3 or higher.

COMMAND /D              Undoes the /F switch temorarily. Type EXIT to
			return to the auto-fail version of DOS. Use at
                        the DOS prompt or in batch files only. Requires
                        DOS 5.0 or higher.

COMMAND /T              (Only in MS-DOS 7.x, the DOS that comes with
        /Z              Windows 95 and 98.) Undocumented switches for
                        COMMAND.

COMMENT comment_ID      (CONFIG.SYS only) Allows you to put comments onto
			the end of CONFIG.SYS commands. For example,
                        COMMENT ;  lets you use:
                        DOS=HIGH       ; Loads DOS into high memory
			Requires DOS 4.0 or higher.

CPSW                    (CONFIG.SYS only) Only in DOS 4.0x; turns on
			(CPSW=ON) or off (CPSW=OFF) code page switching.

DIR,                    (DIR followed by a comma) Displays ALL files in 
			the current directory, including hidden and
                        system files. Does not work in MS-DOS 7.x, the DOS
                        that comes with Windows 95 and 98.

DOSKEY /APPEDIT         (As far as I can tell, only in MS-DOS 7.x, the
       /COMMAND         DOS that comes with Windows 95 and 98.) Some
       /PERMANENT       undocumented switches for DOSKEY. Anybody know
       /SCRSIZE         what they do?
       /XHISTORY

DRIVPARM                (CONFIG.SYS only) Documented in DOS 4.0 through
                        6.x; undocumented in DOS 3.2, 3.3, PC DOS 7, and
                        PC DOS 2000. Works fine in MS-DOS 3.2/3.3 and PC
                        DOS 7.0/2000, but requires special handling in PC
                        DOS 3.2 or 3.3; see end of file.

FDISK /MBR              Re-writes the hard disk drive's Master Boot
			Record. Useful if you hard disk drive just won't
			boot up properly after you format it or after
			you suffered from a MBR-corrupting virus.
			Requires DOS 5.0 or higher.

FDISK /PRI              Other undocumented FDISK switches. /STATUS is
      /EXT              documented in DOS 6.0 and higher. /Q and /STATUS
      /LOG              require DOS 5.0 or higher. /STATUS shows the
      /Q                current status of your disk drive partitions.
      /STATUS
      /X

FORMAT /AUTOTEST        No-questions-asked format; just formats then
			exits. No prompt for volume label and no disk
			information is displayed. Requires DOS 4.0 or
			higher.

FORMAT /BACKUP          Like /AUTOTEST except asks for volume label and
			displays disk information (free space, etc.).
			Requires DOS 4.0 or higher.

FORMAT /SELECT          Removes the format from a formatted disk; press Y
			then Enter at the pause. No messages displayed.
                        DOS 4.0x's Setup program used this switch to
                        remove a 12-bit FAT format from a hard disk before
                        reformatting it with a 16-bit FAT, which allowed
                        use of hard drives bigger than 32 Mb. Requires DOS
                        4.0 or higher.

FORMAT /U               Suspiciously not documented in MS-DOS 7.x, the DOS
                        that comes with Windows 95 and 98.

IFS                     (CONFIG.SYS only) Only in DOS 4.0x. Loads
                        Installable File System drivers. Uses the same
                        format as DEVICE (IFS=C:\DOS\IFSDRVR.SYS etc.).

INSTALLHIGH             (CONFIG.SYS only) Works the same as INSTALL
			except loads the program into upper memory.
			Requires DOS 6.0 or higher.

LH                      In DOS 5.0 or higher, LH is not documented in
			the /? help as an abbreviation for LOADHIGH but
			it works fine.

MULTITRACK              (CONFIG.SYS only) The default is MULTITRACK=ON,
			and MULTITRACK=OFF solves compatibilty problems
			with antique hard disk drives. Requires DOS 4.0
			or higher. See end of file for more information.

QBASIC /EDCOM           In DOS 5.0 or higher, this is the undocumeneted
                        QBASIC switch EDIT.COM uses to start the Editor.
                        /EDCOM *must* be typed in all capitals. /EDCOM
                        may be combined with /? to provide help on the
                        Editor's options.

QBASIC /QBHELP          In MS-DOS 6.0 or higher, this is the undocumented
                        QBASIC switch HELP.COM uses to start MS-DOS Help.

RESTORE /Y              Some undocumented switches for the RESTORE
        /Z              command. Anybody know what they do?

SCANDISK /CLIP        - Only in MS-DOS 7.x. Shortens long file names to
                        regular 8.3 format. (?)
         /HELP        - Same as /?. Works with MS-DOS 6.x and 7.x.
         /MOUNT       - Mounts DriveSpace volume. Same as using
                        "Mount=Always" in SCANDISK.INI Only in MS-DOS 7.x.
         /NEW         - ??? Only in MS-DOS 7.x.
         /NOLOST      - No prompt for surface scan, no check for lost
                        clusters. Only in MS-DOS 7.x.
         /NOUI        - Only in MS-DOS 7.x. Uses normal DOS interface
                        instead of Windows 95 graphical interface.
         /TEXT        - Only in MS-DOS 7.x. Same as /NOUI. (?)
         /TIME        - Works with MS-DOS 6.x and 7.x. During surface
                        scan, marks sectors that take longer than usual
                        to read. These sectors may be on their way to
                        failing totally. Same as using "ScanTimeOut=On"
                        in SCANDISK.INI.

SET NO_SEP=1            Removes the commas from numbers in DOS 6.2 and
			higher. Type SET NO_SEP= (nothing after the =)
			to turn commas back on. Documented in PC DOS 6.3
                        and higher but undocumented in MS-DOS 6.2 and
                        higher.

SHARE /NC               No Count -- When a program asks how many sharing
                        locks are left, it always responds with whatever
                        the maximum is, no matter how many locks actually
                        are in use.

SWITCHAR                (CONFIG.SYS only) Only in DOS 2.x. Lets you change
                        the switch character (usually "/") to some other
                        character using SWITCHAR=x. See end of file for more
                        information.

SWITCHES /K             Undocumented in DOS 4.0x; documented in DOS 5.0
			and higher. Turns off support for 101-key
                        "enhanced" keyboards to make old programs happy.

TRUENAME filename.ext   Displays the true, complete path of the file name
                        specified. Ignores ASSIGN, JOIN, or SUBST re-
			assignments. If no file name is specified,
                        displays the current complete path. When used on a
                        network or CD-ROM drive or file, TRUENAME responds
                        in the following format:

                        //server/volume/dir/dir/file.ext

                        Interestingly, the /? switch works with TRUENAME
                        in PC DOS 7 (only), but it's not listed in the on-
                        line help system. Requires DOS 4.0 or higher.

VER /R                  In MS-DOS 5.0 or higher, displays the DOS
			revision number and where DOS is loaded (low
			memory, HMA, or ROM). In PC DOS 5.0 or higher,
			displays where DOS is loaded (the DOS revision
			number is always displayed in PC DOS).

XCOPY /Y                Not documented in MS-DOS 7.x, the DOS that
      /-Y               comes with Windows 95 and 98. /Y gets rid of
                        overwrite prompts, /-Y causes them if COPYCMD=/Y.

Additional information about AVAILDEV, DRIVPARM, MULTITRACK, and
SWITCHAR:

AVAILDEV
Syntax: AVAILDEV=TRUE  or  AVAILDEV=FALSE
Default: AVAILDEV=TRUE

This commmand controls the access to devices. Usually devices are
accessed by name (e.g. CON or LPT1). This behavior might be undesirable
however if the user decides to use a device name as file name. AVAILDEV
has been removed from DOS version 3.0 and higher so that there is no
ambiguity when accessing a network. If CONFIG.SYS contains the command
AVAILDEV=FALSE, the access to devices is only available using a
non-existent file in the non-existent directory \DEV. For example, the
device COM1 could be accessed as \DEV\COM1.

DRIVPARM
In PC DOS 3.2 and 3.3

When using PC DOS 3.2 or 3.3, DRIVPARM is undocumented but it can be
made to work using this trick. In CONFIG.SYS, type:

	       Normal DOS 4.0+ DRIVPARM set-up switches.
		   \/
DRIVPARM ^A^A^A {switches}
	   /\
       Type Ctrl-A, not Shift-6 A. In MS-DOS's Edit, type Ctrl-P
       then Ctrl-A (you will see a smiley face on the screen).

MULTITRACK
Syntax: MULTITRACK=ON  or  MULTITRACK=OFF
Default: MULTITRACK=ON

Starting with DOS 4.0, disk accesses have been optimized to get better
performance when working with "newer" hard disk drives. Among other
things, reading and writing of more than one track with a single BIOS
call has been implemented. But some problems have been obeserved with
hard disk drives of some manufacturers. So the MULTITRACK=OFF option
limits disk access to a single track.

SWITCHAR
Syntax: SWITCHAR=char
Default: SWITCHAR=/

Until DOS 3.0 you could select the character that has to precede each
switch. You could use the UNIX-style command syntax when using "-" as
the switch character instead of "/". There is a DOS system function
(Int 21h, function 37h, subfunctions 0 and 1), undocumented until DOS
3.0, to get or set this switch character. Not all commands in all DOS
versions did actually support this feature. That the reason for the
removal of this option is the growing use of network software, where a
selectable switch character would cause problems.
_ _ _

If you find any other undocumented commands, or if you have any
additional information on the commands listed above, please tell me!
Send e-mail to:

  Kevtronics
  76362.2023@compuserve.com

Posted in misc, Retro Computing | Tagged | Comments Off on undocumented DOS commands

Toshiba T4600 teardown and P30 error repair

My T4600 didn’t boot any more and just showed a P30 error on the small LCD.
Fortunately this seems to be a known problem: a capacitor died and has to be replaced.
But getting this thing apart and back together is a god damn jigsaw puzzle. I took it apart twice and both times I ended up a few screws too many…

  • 1. Let’s start with the hidden screws. The first one is right above the F9 key, under the function key label.

  • 2. Peel back the label and open the small cover.
  • 3. There is our first screw.
  • 4. Now we need to remove the battery. On the left side of the laptop, slide the cover towards you.
  • 5. Press the button underneath and the battery will pop out. Take it out completely.
  • 6. Turn the laptop upside down and look into the battery compartment. There’s our second hidden screw.
  • 7. Now we go to the back and remove those three screws.
  • 8. Remove this plastic part. It’s just there to hide the next two screws.
  • 9. Remove those two screws.
  • 10. Push down the display lid until it’s almost flat. Then gently pull up the top part of the plastic case. It should be loose.
  • 11. Pull up on both sides of the case.
  • 12. Now work your way to the front and wiggle the plastic frame loose. There are no more screws, but it holds pretty firmly. You may need some force, but try not to break it.
  • 13. This may help a bit. You can see the latches where it’s connected.
  • 14. Lift the keyboard and detach its ribbon cable. Gently pull the small tabs right and left of the brown connector and the cable will be released.
  • Your Toshiba should now look like this. That was the easy part, now let’s get at it.
  • 15. To get further into the machine, we need to remove those cursed 13 screws to remove the metal sheet. Pay attention to the small LCD! Flip it over to the top to get it out of the way. It’s ribbon cable is very delicate!
    The two screws on the right will release a metal bracket.
  • At this stage you will have access to the floppy and harddisk by removing some obvious screws.
    As we want to fix the P30 error, we have to go down deeper. Down the rabbit hole to the PSU!
  • 16. One more screw on the top left beneath the display hinge.
  • 17. Similar on the right hand side. The small metal bracket will fall of. Try to remember which way to put it back in.
  • 18. You can now move the display a little bit to remove the plastic underneath it. Then unplug the small cable.
  • 19. Disconnect all the cables to the display. There are four:
    – two cables with white plugs. Gently pull them up
    – one ribbon cable. pull the small tabs right and left and it should lift. then pull the ribbon cable.
    – there’s a smaller white plug on the right, this one should be easy.

    I left the batteries connected to not lose the CMOS data.
  • 20. You should be able to completely remove the display now.
    But we’re not finished yet!
  • 21. With the display removed you get access to this screws.
  • The right screw will release a metal bracket, keep it safe and don’t lose it.

  • 22. And this one…
  • 23. … and this one, too.
  • 24. This is kind of in the centre.
  • 25. This is a little further down. The ribbon cable around this screw is the floppy connector, btw.
  • 26. Now this is an interesting stage. With all the screws removed, you can lift up the whole package. we have to work on the underside of this. So flip it over towards you to reveal its underbelly.
  • 27. If you did it right, you should see those three screws. Remove them, too.
  • I think we are way past this point of caring about the warranty…
  • 28. But wait, there’s more!
    On the right hand side…
  • 29. Remove the metal bracket thingy like so.
  • We’re getting close!
  • 30. Now you should be able to open the mainboard sandwich like a book.
  • On the top left of this picture you can see the PSU we want to get to!
  • 31. Disconnect the small white ribbon cable.
  • There we can see our faulty capacitor! But we need to get this board off for the soldering part.
  • 32. Luckily the PSU board can be pulled off without any more screws. It’s just plugged in to this white slot.
  • 33. And here it is, the stinky capacitor. It doesn’t look blown out on top, but it’s leaking below.
  • It is a 1000uF capacitor with 6.3V.
    Pay attention to it’s height! Most replacements are taller and won’t fit when putting the board back into place.
  • I didn’t have a 6.3V capacitor and replaced it with an 12V.
  • What a mess!
  • That’s about 45 screws!

GOOD LUCK PUTTING IT BACK TOGETHER!

Posted in Toshiba | Tagged , , | Comments Off on Toshiba T4600 teardown and P30 error repair

Toshiba T4600C 486 Laptop

Toshiba T4600C


Year: 1990
CPU: 486SL 33Mhz
RAM: 20MB (4MB + 16MB RAM card)
Disk: 500MB
Floppy: 1.44MB (broken)
Ports: VGA, PS/2 Mouse & Keyboard, parallel, serial DB9, Dockingstation, 2x PCMCIA

This laptop was a top-of-the-line business machine in 1990!
It has 4MB RAM onboard and an additional 16MB RAM card in a slot on the left side.
Besides the colour display there’s a small LCD to show various system information like battery capacity in %, battery remaining time, disk & floppy activity and bootup error messages. On this very same display I got the error P30 (B3V Voltage is over the maximum allowable limit) and the machine didn’t boot anymore. Read about this issue and how to fix it here.

The laptop was used by an insurance company and had to be very mobile. I got this laptop neatly packed in a Samsonite suitcase, which also includes an HP printer! And everything is already cabled and connected: just plug in the power cord and it’s ready to work, right inside the suitcase!

This Toshiba already includes a security chip: the harddisk is encrypted and cannot be read in another computer (I tried!). It has a BIOS password configured, which is known to me, but I cannot disable the security encryption, as it is in “advanced security mode”. I guess there is a special ‘admin password’ to disable this. There seems to be no way to reset the bootup password, not even with a jumper on the mainboard. The laptop has to be sent in to Toshiba for a reset.

Some nice features and interesting bits:

  • it has a trackball which can be clipped on the right side of the keyboard. Unfortunately the ball is missing in mine.
  • the lid on the PCMCIA slots can be openend in three separate parts. To connect the phone or ethernet cable, just open the small lid. to get full access to slot one, fully open the top lid. to get access to the 32bit slot, take off the big lid (see photos, it’s hard to explain).
  • it has three batteries in total: the big one for the laptop itself, a AA battery for the small LCD and a button cell for the CMOS.
  • the construction seems overly complicated. I removed 45 screws when I did the teardown to fix the P30 error! It’s a damn jigsaw puzzle to put it back together…

Posted in Toshiba | Tagged , , | Comments Off on Toshiba T4600C 486 Laptop

olivetti LSX 3010

olivetti

LSX 3010

Year: 1988
CPU: Motorola 68k
Disks: 2x 60MB
OS: X/OS System V Rel. 2 Ver. 2
Ports: 1 Console Port, 3 Serial Concentrators with each 6 serial ports

History of this olivetti LSX 3010 (serial 01 89 013486 A)

The company ‘mgs informatik’ sold this machine in 1989 to the customer
‘Berner Lehrer Verein’ in Switzerland.
It ran a software called LOGO written in COBOL from the very same company
‘mgs informatik’. LOGO was used for address management and accounting.

Around 1998 (I cannot remember the exact year anymore) this server got replaced
with a Compaq server running WinNT SBS to run LOGO and the client terminals were
replaced with Compaq Windows PCs.
Shortly after the migration I deleted the customer’s data and since then this machine has been in my possession and waiting for resurrection in the attik.
In 2021 I booted it up and it still run perfectly. As this is a rare machine and OS,
I backed up the data from its disks to conserve for the future.

The filesystem on the machine seems to be limited to a maximum of 10MB per file.
That’s the reason I made about 10 separate tar files to not exceed this limit.
Those tar files are then combined in an additional tar.gz for convenience.
I copied the first 512bytes of each disk or partition (/dev/fphd* ) to hopefully
catch the MBR and bootsectors. But I couldn’t find the device file of the physical disk.
So maybe someone more experienced can find the data in those files (in mbr.tar)

In 2021 I uploaded it’s data to archive.org and handed over the server hardware
to Heiko Schumann of https://olivrea.de
He is a passionate collector of vintage Olivetti hardware and I’m sure this box
will have a good permanent home now :)

How to connect

The server does not have external connections besides serial ports. So it’s not possible to connect it to a network.
To connect and backup the system I used a Macbook on macOS Catalina 10.15.7 with an USB2serial adapter using the following settings in Kermit 9.0:

C-Kermit>SET LINE /dev/cu.usbserial-xxx <=== use your own serial device here… C-Kermit>SET SPEED 9600
C-Kermit>
C-Kermit>connect

Olivetti X/OS System V (9600)
login: root
Password:

#

to download files use the following command while being connected with kermit:

# kermit -b 9600 -i -p n -s

your local kermit will automatically accept the file and show the following
transfer information:

C-Kermit 9.0.302 OPEN SOURCE:, 20 Aug 2011, myMacbook2020.local

Current Directory: /Users/username/ <==== this is your local folder

Communication Device: /dev/cu.usbserial-xxx <==== this is your local serial device
Communication Speed: 9600
Parity: none
RTT/Timeout: 01 / 03
RECEIVING: FILENAME.TAR => filename.tar <==== remote and local filename
File Type: BINARY
File Size:
Bytes So Far: 1486078
...10...20...30...40...50...60...70...80...90..100
Estimated Time Left: (unknown)
Transfer Rate, CPS: 505
Window Slots: 1 of 1
Packet Type: D
Packet Count: 101403
Packet Length: 92
Error Count: 0
Last Error:
Last Message: Transfer OK

X to cancel file, Z to cancel group, to resend last packet,
E to send Error packet, ^C to quit immediately, ^L to refresh screen.

Posted in olivetti | Tagged , , | Comments Off on olivetti LSX 3010

olivetti M316 teardown

It’s always hard to take apart an unknown laptop. Here’s a teardown of the olivetti M316, so you don’t have to make the same mistakes as I did.

  • 1. Remove the display sliders. They are just clipped on, carefully pull them out.

  • 2. After removing the sliders, try to lift the keyboard label above the function keys. I had to use a hot air gun. There is a hidden screw between the F5 and F6 keys under the label.
  • 3. There’s the hidden screw! This one took me half an hour to find…
  • 4. Now remove the HDD and floppy covers. They are just clipped in, but try not to break the plastic. Pay attention to the floppy drive button. It will fall off as soon as the cover is removed.
  • 5. We need to remove the battery. It is in the top right corner of the machine.
  • 6. Close up of the battery cover, it’s quite stealthy…
  • 7. Push the door away form you. Mine was stuck pretty hard. It will move just a little bit, like in the photo.
  • Then lift it up to remove.
  • 8. Now you should see the battery. To remove it, pull the lever on the battery.
  • 9. Below the battery there is a screw. Remove it and secure it somewhere. There’s only one screw type like this, so don’t lose it.
  • 10. Now turn the laptop and open the cover of the ISA slot. It’s one very long screw (there are 5 of those long screws in total).
  • 11. If you have an ISA card installed, you have to remove the screw on the top right to get the card out.
  • 12. Now remove all of those screws. There are 4 long and 4 shorter screws.
  • Turn the laptop back to normal and you should be able to lift the back of it, including the monitor.
  • The frame around the front of the keyboard is just clipped in, carefully wiggle it free.

  • 13. Now you should be able to open it up like a car hood. But be carefull, there are 5 cables connected (power button, fan, battery, display power and display data).
  • I didn’t have a third hand so I turned the laptop sideways.
  • The power button and fan cables are the shortest ones, disconnect them first.

  • 14. Remove the two screws to remove the keyboard. It is attached with a ribbon cable, but it’s pretty long.
  • The HDD and floppy are underneath the metal shield.

  • 15. The CMOS battery is under the keyboard. It’s easily reachable and detachable. It’s a 3.6V rechargeable three button cells pack. I tried with a 3V first, but the CMOS could not hold the data. It really needs 3.6V.
  • That’s how it looks like under the metal cage. The HDD and floppy cables are very short! Be carefull when detaching and reconnecting those.
  • The Conner CP3044 40Mb HDD
  • mainboard overview

Posted in olivetti | Tagged , , , , | Comments Off on olivetti M316 teardown